Navigation list
News center
- Complete list of maintenance fau
- Wanhao projector operation video
- Wanhao image measuring instrumen
- Operation Manual of Wanhao Image
- Wanhao projector instructions
- Official telephone number of Wan
- Official website of Wanhao Proje
- The processing method of jump nu
- Application of Wanhao image meas
- Domestic exhibitions in 2022 (as
- Explore the current situation of
- A brief analysis of the structur
- What is the function of the tool
- Precautions for use of measuring
- Usage of measuring projector
- Wanhao imager vms-3020g
Contact us
- Add: Jiangsu province Wuxi City New WU District
- Tel: 0510-81819749
- Fax: 0510-81819749-9
- Email: gc1718@163.com
Transformation of digital display technology of tool microscope
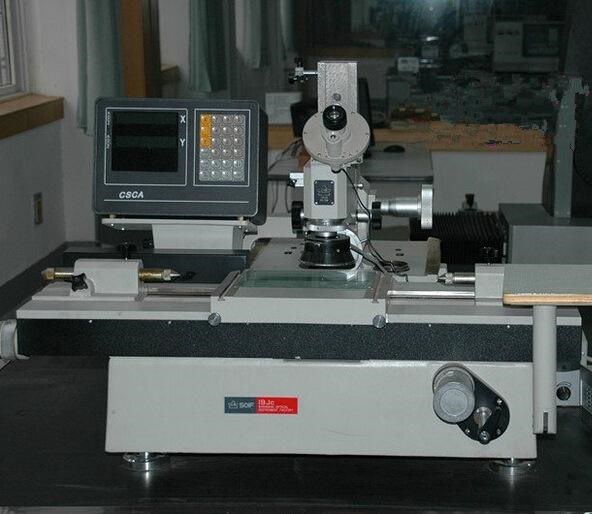
Universal tool microscope can measure the length, angle, thread and many other geometric parameters of parts. It is a kind of testing instrument widely used in length measurement and detection. Therefore, it is widely used in various enterprises of mechanical processing industry. However, with the development of modern industry and the progress of science and technology, the traditional old-fashioned universal display has been difficult to meet the requirements, so it is necessary to carry out technological transformation. Taking a universal tool microscope as an example, this paper introduces the transformation of digital display technology of universal tool microscope.

Modification of digital display system
Based on the user's experience in applying grating, magnetic grating and ball grating digital display systems in the equipment for many years, Mori calorimeter compares the characteristics of different digital display systems, and selects wta1 type high-precision grating digital display system through performance and accuracy testing. The system has the advantages of high manufacturing accuracy, good stability, good reliability, simple device, convenient debugging, low environmental requirements, and is suitable for the transformation of universal display.
According to the measurement range of the universal work display is 200mm in the ordinate and 100mm in the abscissa, two gratings of wta1-250 with a measurement range of 250mm and 100mm are selected; Select the matching Wanhao digital display meter we6800-2 two axis digital display meter (* small resolution is 0.2 μ m) It has a sensor interface and can be matched with wta1 original metering sensor.
Device of digital display system
Since the installation of digital display system must be carried out without affecting the original optical system of the instrument, the device scheme is adopted: install a 250mm long magnetic ruler on the right side of the longitudinal guide rail (the left side is the original glass scale of the instrument), and due to the limitation of the device location, a support block must be installed on the right side to fix the right end of the grating; 100mm grating device is on the side of transverse guide rail. According to the device process conditions on the instructions, adjust the base plane of the two ruler devices to be parallel to the longitudinal and transverse guide rail movement directions (horizontal and vertical directions), and the parallelism is less than 0.1mm (usually it can be easily adjusted to within 0.05mm when installing).
3、 Debugging of digital display system
Commissioning of longitudinal coordinate: take down a glass workbench on the longitudinal guide rail, grind 10mm gauge block accessories on both ends of a 200mm three equal gauge block respectively, and scrape it on the longitudinal guide rail to make it in the same line with the grating ruler device, so as to reduce the Abbe difference. Then, the measuring head of the measuring sensor on the horizontal carriage of the instrument contacts with one end of the gauge block. At this time, the digital display meter starts counting, and then move the longitudinal guide rail to make the sensor probe contact with the other end of the gauge block. At the moment of contact, the digital display meter stops counting and keeps the data. The difference between the displayed value of the digital display meter and the actual size of the gauge block is the difference of the digital display system. If the difference is less than 3 μ M does not need to be corrected, if it is greater than 3 μ M, linear compensation can be carried out through the difference compensation system of the digital display meter according to the size of the difference, which can make the difference less than the specified value or even close to zero.


