Product categories
News center
- Changzhou Wanhao Image Surveyor
- Measuring method for measuring a
- Complete list of maintenance fau
- Wanhao projector operation video
- Wanhao image measuring instrumen
- Operation Manual of Wanhao Image
- Wanhao projector instructions
- Official telephone number of Wan
- Official website of Wanhao Proje
- The processing method of jump nu
- Application of Wanhao image meas
- Domestic exhibitions in 2022 (as
- Explore the current situation of
- A brief analysis of the structur
- What is the function of the tool
- Precautions for use of measuring
Contact us
- Add: Jiangsu province Wuxi City New WU District
- Tel: 0510-81819749
- Fax: 0510-81819749-9
- Email: gc1718@163.com
Product Numbers:201321119318
Price:
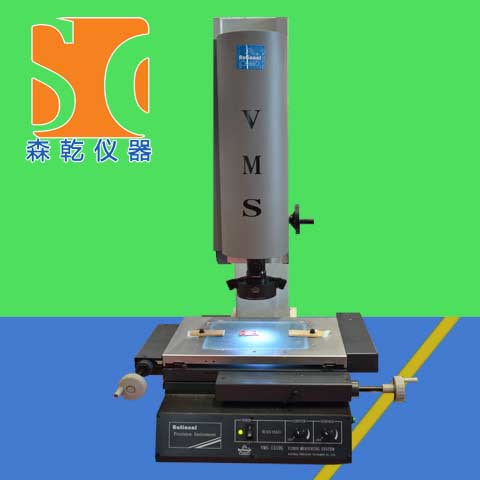
Product introduction:Video Measuring System VMS-2515G Standard series video measuring system is mainly applied in 2D measurement, this video measuring system is widely used in different kinds of precision finishing industries。
Video Measuring System VMS-2515G
Standard series
Usage
Standard series video measuring system is mainly applied in 2D measurement, this video measuring system is widely used in different kinds of precision finishing industries, such as mechanism, electronic, plastic and so on.
Specialities
Video measuring system is a photoelectric measuring system of high precision and efficiency. This video measuring system is composed of series of components, such as high resolution CCD color camera of high resolution, continuous, zoom lens, color monitor, video crosshairs generator, precision linear scale, multi-functional digital readout(DRO), 2D measuring software and high precision working table. This video measuring system is supplied with RS-232 interface, the user can manage and output the graph by connecting with PC and running the M2D program.
| Model | VMS-1510G | VMS-2010G | VMS-2515G | VMS-3020G | VMS-4030G | |
| Working table | The metal table's size(mm) | 354×228 | 404×228 | 450×280 | 500×330 | 606×466 |
| The glass table's size(mm) | 210×160 | 260×160 | 306×196 | 350×250 | 450×350 | |
| Travle(mm) | 150×100 | 200×100 | 250×150 | 300×200 | 400×300 | |
| Weight(kg) | 100 | 110 | 120 | 140 | 240 | |
| Dimension(L*W*H)(mm) | 540*560*850 | 540*560*850 | 760*600*900 | 760*600*900 | 970*670*940 | |
| Working distance | 108 mm | |||||
| Z-axis travel | 150 mm | |||||
| Resolution of X-axis and Z-axis | 0.5μm | |||||
| The reading error of X-axis and Y-axis | (3+L/75) μm (L is the length of the work pieces to be measured,unit:mm) | |||||
| Video system | Camera | Colour 1/3〞CCD camera | ||||
| Total manification | 33X--195X | |||||
| Magnificaton of zoom lens | 0.7X--4.5X | |||||
| Object view | 8.1mm--1.3mm | |||||
| Surface and transmission illumination all the LED, and the light is adjustable | ||||||
| Power | 180V(AC)-260V(AC) | |||||
| Power | 50 HZ | |||||
| Measuring and aiming system | VMS-F/Ⅰ(standard) | USB302 /M2D-IMG | ||||
| VMS-F/Ⅱ(option | DC3000 Data Processor/ M2D-IMG | |||||
| VMS-F/Ⅳ(option) | M2D-AT/QIM3008//M3D-MB/Computer/USB-303/RENISHAW MCP PROBE | |||||
| Standard and option | ||||||
| Accessories | 1X tube(standard) | 0.5X tube(option) | Working distance | |||
| Zoom lens | 0.7X~4.5X | 0.7X~4.5X | mm | |||
| Appending lens | Video multiple | Object view(mm) | Video multipe | Object view(mm) | ||
| 0.5X(option) | 16.5X--97.5X | 16.2--2.6 | 8.3X--48.5X | 32.4--5.2 | 189 | |
| Standard | 33X--195X | 8.1--1.3 | 16.5X--97.5X | 16.2--2.6 | 108 | |
| 2X(option) | 66X--390X | 4--0.7 | 33X--195X | 8.1--1.3 | 38 | |
| Ideal table Loading ≥350kg,Dimension(L*W*H)1000*600*500(mm) | ||||||


